Creating Hyperlinks with the Text Editor
Hyperlinks make your website more interactive by allowing visitors to jump to other pages on your site or even to a position farther down on the current page. Linking within the pages of your website is important for SEO too. In addition to the structured menus LVSYS provides, links from one section of your website to another in the body text are also evaluated by search engines and can help increase your rankings and traffic.
The WYSIWYG editor provides a comprehensive tool for creating and modifying hyperlinks. To add a hyperlink to your body text:
- Copy the URL you wish to link to.
- In the body of your item, select the text that will serve as the clickable link.
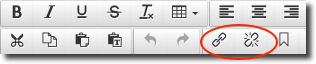
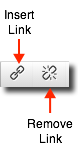
- Click the Insert Link button (looks like a chain).
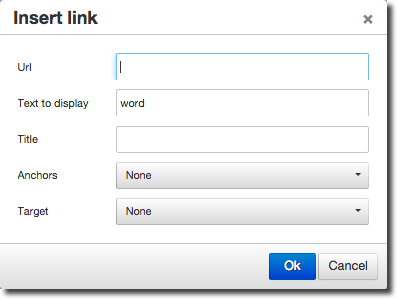
- In the Insert Link dialog box, right click on the Link URL field and paste the copied URL.
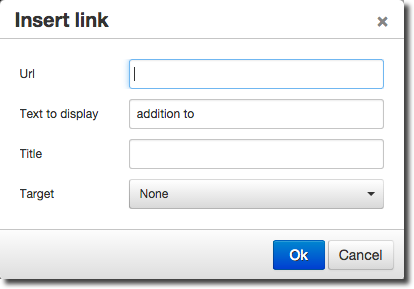
- Choose a target for your link to open in - the default is to open in this/ current window. When you direct the link to open in this window, hitting the back arrow will return you to the page with the link.
- Enter text in the Title if desired.
In some browsers, Title text appears as a tip when you hover on a link or may be spoken for users who activate accessibility features. - Click OK.
External sites should open in a new window. When linking to an external site, choose Open in New Window in the Target field.
Modifying Links with the Text Editor
It’s easy to modify hyperlinks you’ve made in the text editor. 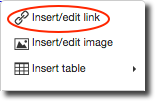
- Position your cursor in the linked text by clicking once in the text.
- Click the Insert/Edit Link button or right click and choose Insert/Edit Link.
- In the Insert Link dialog box, make desired changes and click Update.
DO NOT try to select all of the hyperlinked text to modify. Just click once anywhere in the linked text so you don't miss a leading or trailing space or character.
Linking to an Email address or Phone Number
- In your article body text, select the text that will serve as the clickable link.
- Click the Insert Link (chain) button.
- In the Insert URL dialog box, enter mailto:insert email address OR tel:insert phone number
- Click Save.
- When clicked, the link will open an email screen or call the phone number.
Removing Links with the Text Editor
It’s easy to delete hyperlinks:
- Position your cursor in the linked text by clicking once in the text.
- Click the Remove Link button (above).
Hyperlinking to a Section on the Same Page
When you wish to hyperlink to a section on your current web page, instead of jumping to another page or site, you use an Anchor. The Anchor provides a reference point and name for a hyperlink to jump to. Use the Anchor name instead of a Page name or URL.
Insert an Anchor:
- Click in front of the text you wish to hyperlink to.
- Click Anchor on the toolbar.
- In the Anchor dialog box, enter a name for your anchor. Do not use spaces – use dashes to separate words.

An anchor symbol appears in the text indicating the anchor is set.
Do not select the text where you wish to place the anchor. You only need to click the place where you want the hyperlink to jump to.
Hyperlink to an Anchor:
- Highlight the text that will serve as the clickable link.
- Click the Insert Link button.
- In the Insert Link dialog box, choose an anchor from the Anchors field.
- Click Update to create the hyperlink.
Removing an Anchor
When you remove an anchor, you must remember to remove references to it in your hyperlinks. To remove an anchor:
- Position your cursor in front of or behind the anchor symbol in your text.
- Press Backspace or Delete to remove the anchor.
- Save.
Remember to remove all references to the Anchor in your hyperlinks!
Creating a Hyperlinked Image
Make an image a hyperlink in the Media Tab or by using short code in the body text of your product, article, event, etc. Hyperlinking in the Media Tab allows the user to go to another page on your website when they click the image. A hyperlink made via short code allows you to link within your site or to another site.
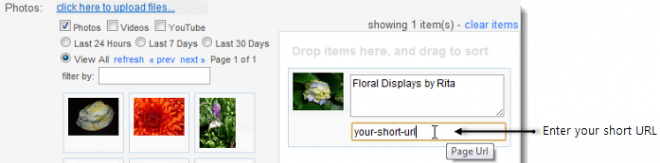
Creating a Hyperlinked Image in the Media Tab:
- Click in the lower field – when you hover over the field, Page URL displays as a tool tip.
- Enter the desired short URL from your website in the Page URL field.
- Save and test on the website to ensure it works properly.
Creating a Hyperlinked Image with Short Code
Using short code allows you to hyperlink an image in the body text to both an internal or external URL. To use short code to hyperlink an image, insert the code snippet link| before the image short code and |url= at the end of the short code.
- In the article body, click in the spot where you wish to add the image.
- Enter ( ( link|img=image name.jpg|url=http://URL you wish to link to ) ).
The code syntax, image name, image extension (.png, .jpg) and URL must be exact or it will not work. - Specify other link attributes, such as width, by adding code. See: Short Code Reference.
- Save and test the article/image on the website to ensure it displays and links correctly.
If you see the *image name* not found error message, check the code syntax and image name. Any error prevents the image from displaying.
URLs that contain an equals sign ( = ) cannot be used in short code. If you need to link to a URL that contains an equals sign, use the text editor option or create a redirect page instead. For more information on creating a redirected web page: Templates, Redirected and Raw HTML Pages
For complete information about uploading and using Images, see: Adding Images & Attaching them to Items.