Contacts are collected automatically as visitors interact with your website as customers, commenters or members. The CMS is pre-loaded with four customer groups: Customer, Contact, Member and Commenter and as visitors interact, the contact is created and automatically assigned to the appropriate group. A contact is also collected when a visitor submits a form.
Each time an existing contact returns to your website and triggers one of the interactions mentioned above, their contact is updated and recorded in the Activity Tab described below.
Viewing & Modifying Contacts
You can view all of your contacts in list view and click on a contact to modify the information. You can also use Live Edit to make changes in the list view.
Changing a Contact E-mail
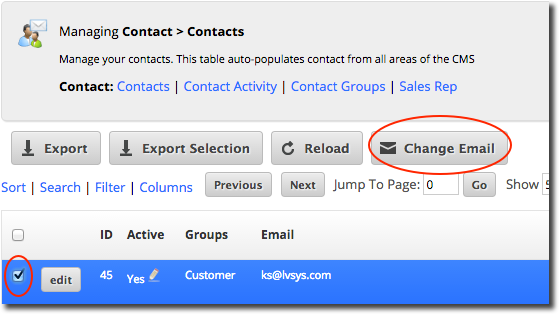
Contact email addresses are stored in three places: the contact and contact activity databases on the CMS and the contact vault, hosted off the website, for use with the POS system. You will need to use the Change Email button from the contact list view to update it.
As shown in the example below, click the box next to the contact you want to edit and then click Change Email.
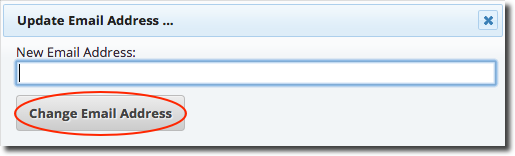
Enter the new email address and then click Change E-mail Address to confirm the change.
Creating a Contact Manually
There may be rare occasions when you want to create a contact manually. A review of the contact tabs and instructions follow.
- From Contacts, click Add New Contact.
- In the Contact Editor, complete the desired fields. Use the following as a guide for completing the fields:
- Email Tab – Contains the core contact fields. Complete fields as desired.
- Groups – Make selections to assign contact to groups.
- Email - Enter an email address. Required field.
- Name, Address, Phone, etc. - Optional
- Activity Tab - Shows the contact's recent activity. Tab appears after the contact visits your site for the first time. Each time the visitor comments, makes a purchase or submits a new form, their activity is summarized in this tab
- Billing Tab – Complete these fields as needed, if your website supports ecommerce.
- Shipping Tab – Complete these fields as needed, if your website supports ecommerce.
- Shipping Method – Choose the customer’s preferred shipping method (FedEx, UPS or pickup). The customer can override when ordering.
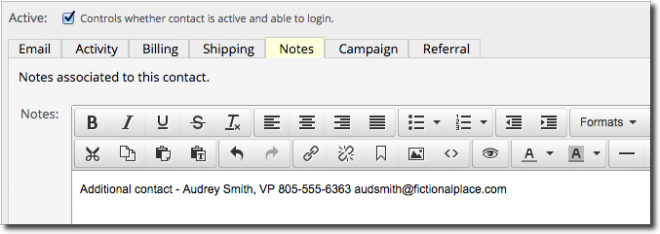
- Notes Tab – Manually enter notes about the contact, if desired. Notes are searchable. One suggested use is to add related contacts and information to the Notes field. You may append notes any time, as needed. See tip below.
- Campaign Tab – This field is informational and cannot be modified. For more information, see Campaign and Referral below.
- Referral Tab – This field is informational and cannot be modified. For more information, see Campaign and Referral below.
- Save when finished.
When a contact is created by the system automatically, the system records the initial contact in the Notes field, including the source of the initial contact activity (example – “Commented on article: Article Name”), and any comment or inquiry text the visitor may have entered. Notes can be appended and modified, as needed.
Using Campaign and Referral Information
The LVSYS CMS records where and how a new contact initiated contact with your website in the Campaign and Referral tabs. The information in these two tabs is not modifiable.
- Campaign – LVSYS records the UTM (Urchin Tracking Module) parameters when a contact’s initial experience with your website comes from clicking through an ad campaign you’ve created. UTM is coding Google uses to track a clicked URL’s Source (site where ad is placed), Medium (banner, link…), Name (campaign name), Term (paid keywords that trigger ad), and Content (differentiating ad text). UTM coding enhances your website’s analytics and in the case of contacts, lets you know precisely what directed them to your site.
- Referral – LVSYS records initial referral information, including the link directing the contact to the form they completed; UTM (if any); and the browser used. Often, a contact’s initial contact with your site is from within your site, so there will be no UTM to view.
For more information on using UTM parameters in your ad campaigns, visit Google’s Custom Campaigns Help section. Google has a handy URL builder that will take your entered parameters and create a URL for you. Go to Google Analytics URL Builder to learn more.