All Tasks > Ad Module > Campaigns
Defining Campaigns
At the most basic level, a campaign is the process of assigning an advertiser’s images and URLs to zones. Follow the steps and tips below to create a campaign.
- Click Add New Campaign to open the Campaign editor.
- Select Active to display the zone on your website.
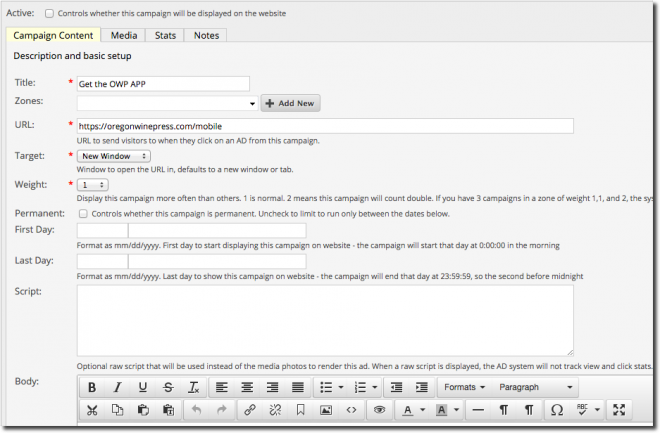
- Complete the campaign fields as follows:
- Title - Enter a descriptive title to identify the campaign.
- Zones - Choose zones for the campaign to display. You may select multiple zones from the menu.
- URL - Enter the URL to direct visitors to when they click the ad.
The system prevents search engine crawlers from causing invalid click throughs. The software outputs invalid links, and then uses javascript to convert them to valid links, guaranteeing the use of a live browser. - Target - The system default is to open clicked ads in a new window. You can also select Same Window. In Same Window, if the ad is clicked on, the link will appear in the same window and if closed the viewer will no longer be at your website. New Window is recommended.
- Weight - If more than one ad displays in the the selected zone, you can adjust the weight if you want a particular ad to display more frequently than others. See explanation of weight below.
- Permanent - Select if the campaign is a permanent display. If not, leave this field unchecked and use the start and end dates below.
- First Day - For defined date campaigns, enter the start date. The campaign will start that day at 0:00:00 (midnight) in the morning.
- Last Day - For defined date campaigns, enter the end date. The campaign will end that day at 23:59:59, so the second before midnight.
- Script - Enter third party/custom scripts for your ad campaign, i.e. Google ads. Any photos in the media tab will not display. NOTE: When a script is entered here, the AD system STATS will include impressions, but not views or clicks.
- Body - Optional information to display with the ad photo.
Configure E-mail notifications
- Click the Media tab and choose your uploaded ad. NOTE -The uploaded graphic must fit the zone’s dimensions exactly or it will not display. For more information see : Uploading and Attaching Media.
- Enter notes, if any, in the Notes tab.
- Save.
Using the Stats Tab
If Stats are included in the client package, you can view the number of impressions each month. The system tracks 12 months of statistics. When you click on the Stats tab, the Months (01-12) and the actual corresponding date display first. Month 01 is the current month. Month 02 is last month, and so on.
Next you will see the impressions and clicks listed by month.
The system uses javascript to record impressions, and is designed to prevent search engine crawlers' visits from being included in the stats.
Using Weight in a Campaign
When more than one ad displays in a campaign zone, you can adjust the weight of a campaign so it displays more frequently than the others. The default weight is 1. If all campaigns in a zone are weighted 1, they will display for an equal amount of time over a 24 hour period.
You may enter a number from 1 to 10. When you assign a higher number (weight), the campaign will display more frequently. Example: If you have 3 campaigns in a zone with the weights 1, 1 and 2, the system will see 4 campaigns and display the third campaign (weight 2) twice as often as the other two campaigns.