The LVSYS CMS allows you to create forms for contact or data collection purposes. Forms can be submitted to multiple email addresses and/or downloadable Excel databases. You can also post data to third party systems.
Setting up a Form
- Open Forms from the Web Site list.

- Click Add New Form.
- Enter the Name and URL for your form and complete the items in the Display Tab shown below.
| Fields | Entry Instructions | Required | |
|---|---|---|---|
| Name | Enter a unique name for the form. The Name is used internally by the system. Use lowercase characters and use dashes in place of spaces. | YES | |
| URL | Enter a direct URL to reach this form. The most efficient way to use a form on your website is to give it a short, descriptive URL. ADVANCED - Forms are directed to display at the template level. | ||
| Display Tab | |||
| Title | The Title displays at the top of the form on the website. | YES | |
| Instructions | Enter text to explain how the form is used or how to complete the form. Instructions display above the form. | YES | |
| Thank You |
Enter Thank You text to display on the website after the user successfully submits. Thank You text is also sent by email to the submitter, whenever an email address is collected on a form. |
YES | |
| Show Captcha | Select to show a Captcha challenge. Captcha requires the user to make an entry before submitting, helping to prevent malicious auto submissions. Using Captcha is recommended. | YES | |
| Captcha Color | Select a captcha color to coordinate with your page color theme. | YES | |
| One Column | Click the box to display labels and fields in one column, rather than the default 2-column layout. | ||
|
Using a Captcha field significantly reduces your exposure to spam. |
|||
| Form Fields | |||
| |
|||
| Form Elements |
Label – Create a label for your form. |
||
| Button Text | Enter label text for the Submit button. | ||
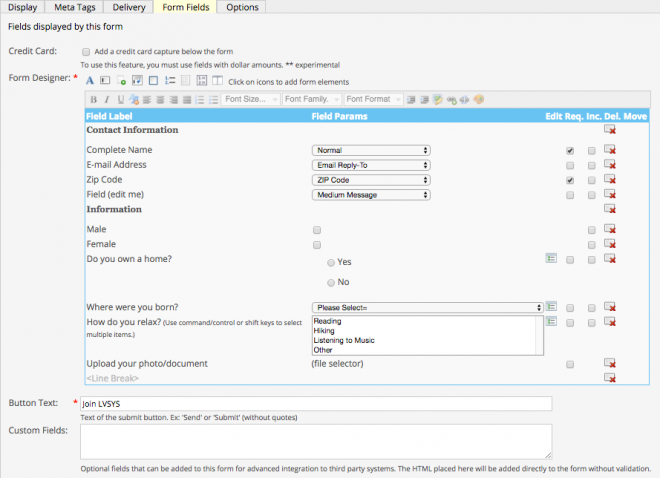
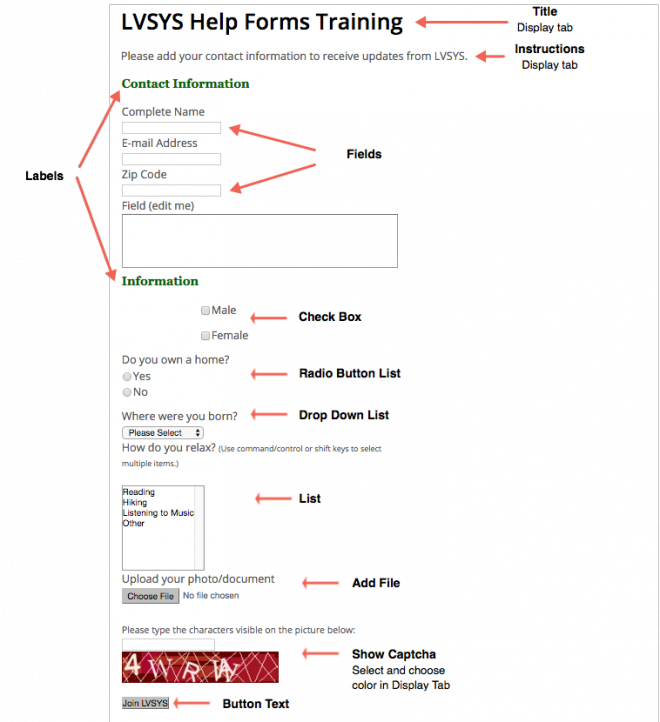
The Form Designer screen appears below, followed by a preview of how the form will appear. You will notice the form elements labeled on the preview. Follow the description below to learn how to preview your form as you create it.
Form Designer
Form Preview
Previewing your Form
As you create your form, you can preview it at any time by clicking on the Preview button. It is not necessary to Save before using Preview.

In Preview mode, a new tab will open and this orange box will appear at the top. You cannot edit from this view, but you will be able to see how the form looks, even if it is not Active.

After you view your preview, close the tab and click back to the form edit screen to make revisions. NOTE: If you edit the article, close the Preview tab and click Preview again. You cannot refresh Preview Mode.
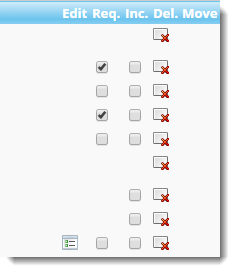
Editing Form Elements
Form fields are added as soon as they are clicked. Modify the fields by clicking the edit options below.
Label and Field Names – Click on the label or field name to change text.
Edit – Click the icon to add items to a list, radio button or drop-down menu.
Req – Select to make the field a required form field for user.
Inc – Select to include the user’s input in the email Subject Field.
Del – Click to delete the field from the form.
Move – To move fields up and down, hover on the Move area. When you see a four--headed cursor, click and drag the field to its desired position.
See Form Training 2 - Form Delivery and Options for the final steps of form creation.
Database Corruption - Once a form has been published and the database contains data, any re-ordering, renaming, removing or adding of new form fields will corrupt the data. If you need to change your form’s layout in any of these ways, you must rename the database in the Param field. This forces the system to create a new database to properly capture your revised form’s data.