The LVSYS Club System makes it easy to send periodic shipments of products from the eCommerce module to contact groups you create.
Live Desktop
The Club System feature uses Live Desktop to manage contacts and payment information.
NOTE: Live Desktop and POS require the Premium eCommerce package.
Visit http://help.lvsys.com and locate Downloads in the menu on the left. Here you will see the most recent version, for example, LVSYS Live Desktop Installer 1.2.2. Click on the link and follow the instructions to install live desktop on your computer. To log in, use the same admin log in and password you use for the CMS Admin Panel.
Two important items must be in place before you can create a club shipment:
1. Contacts
2. Products
Contacts
From Live Desktop you can add new contacts, modify or enter payment information for existing contacts and assign groups to a contact. The search feature allows you to find contacts by email or group.
Contacts include customers who have purchased items through your website or Live Desktop.
Contact groups must be created in your website CMS in All Tasks < Contact Groups
Once you add a group, it will appear in the list of groups on Live Desktop.
Before you set up a shipment, review the contacts in your shipment group to ensure billing, shipping and credit card information is complete and contacts are assigned to the correct group for your shipment.
NOTE: Credit Card information must be entered (or swiped) in Live Desktop.
Products
Every product being shipped in a Club Shipment must be added in your website CMS at
All Tasks < eCommerce < Products. For complete instructions on adding products, see http://help.lvsys.com/training-ecommerce-add-products
Each product in the shipment must have a Name, SKU, Headline, Price, and Weight.
Creating a Club Shipment
Start at your website admin panel in All Tasks < eCommerce < Club Shipments
Click Add New Club Shipment and this screen will open.

From the Products tab, Click the “Add” button (above). The item screen (below) will open.
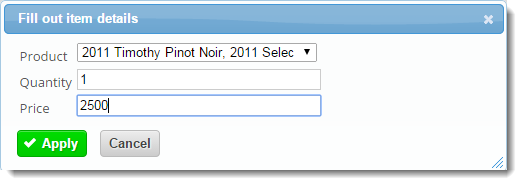
• Select a product from the dropdown menu
• Enter the quantity to be shipped
• Enter the sales price (per item) for this shipment in cents, i.e. $25 = 2500
Hint: Add two zeros to the dollar amount.
• Click Apply
• Add additional products as needed.
Override Cart Price
You can override the total price for all items in the shipment by entering a value in this box. This price does not include shipping. If this field is left blank, the customer will be charged for the total of all items and quantities in the Product list.
Select Contact Group
Select the group you want to receive the shipment. A shipment worksheet will be generated for each contact in the group you specify.
Shipping Fee
The system will calculate the shipping fee for each contact in your group based on the least expensive method (ground service).
By selecting the Use Fixed Shipping Fee box, the shipping fee will be the same for each shipment. Enter the amount, in cents in the Shipping Fee box.
Create Shipment Worksheets
Click SAVE and return to List View of your Shipments. Find the shipment with a status New and today’s date. Check the box on the far left and Click RUN to generate shipping worksheets and complete the shipment.
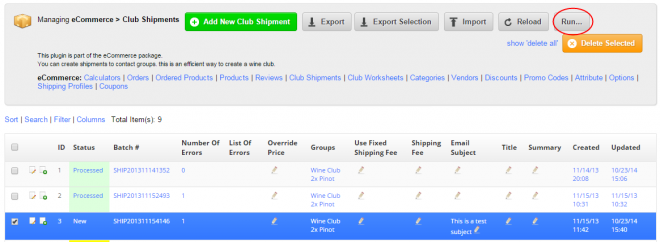
The Run screen will open showing the three steps to the process:

Step 1 - Create Shipment Worksheet
Click Create to process the shipment and create worksheets for each contact. Creating the worksheets is the first step. Contacts are not charged in this step.
NOTE : If product information is missing (i.e. quantity or price) or a contact group has not been selected, you may receive a red error message. Make the necessary changes and Run Create again.
Once the worksheets are created, you have the opportunity to modify a contact’s worksheet before completing the shipment. This may be useful if a small number of customers have specific preferences or requirements in your shipment.
Close the Run screen and click on the Batch ID for your shipment from the Shipment List View. After the Shipment opens, click on the Worksheets tab. Here you will see a list of recipients. You can click on a record, make changes and click Save.

Return to List View, check the box in front of your shipment and click Run again to complete the next step.
Step 2 - Validate Shipment Worksheet
From the Run screen, click Validate. During validation, each worksheet will be checked to be sure shipping, billing and payment information is complete for each contact in the shipping group. This may take up to 10 minutes. You can recheck the status by refreshing your screen.
After Validation, the status of the shipment will change from in-process to one of these three options:
1.) Valid (The shipment is valid and all of the contacts in the group have valid information) - If the shipment is Valid, select the shipment, click Run and Process to charge customers and finalize transactions.
2.) Valid with errors ( The shipment is valid but one or more contacts in the group has invalid information) Click on the Shipment Batch ID and the Worksheets Tab to view errors. You can open the individual worksheets and correct the errors. After all of the errors have been corrected and saved, repeat the steps above by selecting the Shipment and clicking Run, then Validate. This step can be completed as many times as necessary to arrive at a valid shipment. When the shipment is Valid, select the shipment, click Run and then Process to charge customers and finalize transactions.
3.) Failed (There was an error with the shipment) Possible reasons are missing information on products or no contact group.
Step 3 - Process Payment
After Processing, allow the system time to process your transactions. This may take up to 10 minutes. You can recheck the status by refreshing your screen.
It is possible for errors to show up after processing. If this happens, return to the shipment list, open your shipment and view the Worksheets again. Possible errors are expired credit card information or declined transactions. After you correct and Save the contact payment information in Live Desktop, you must return to Run and repeat the last two steps, Validate and Process. You can complete these steps as many times as necessary. NOTE: If a contact's transaction has already been been Processed, it will not be reprocessed when you re-validate and re-process transactions with Error messages.