Before adding products in the CMS, gather all of the details about your products including name, price, quantity, shipping weight and options like package size, color, length, etc. You will also need to consider discounts you want to offer.
Log into the system and from the admin panel navigate to Products as shown below. If you are not familiar with the Admin Panel, See Introduction to the Admin Panel
All Tasks > eCommerce > Products
The Product list screen appears. Here you will see a list of your products. By clicking on Columns, you can select the columns you want to display in this list. Be sure to click Apply Column Selection to save your choices.
You can easily change the order of the columns in your list view. As you hover over the column name, a crosshair will appear. Simply click on a column name and drag it to a new position. Make sure to click Apply Column Selection to save your changes.
- From the Products List Screen, click Add New Product.

- In the New Product screen, complete the fields as shown in the table below.
- Be sure to choose a Category(ies) for the product. Without a category, the product will not display in your online store.
Create a Product by Cloning - Two Ways
The Clone (Copy) feature offers a quick way to create a new product that is similar to an existing product.
- In the List Screen, find the item you want to clone
 and click the article’s Clone button.
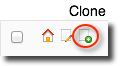
- Open the product you want to clone. After the editor screen screen opens,
 click the Clone button in the toolbar.
Once the new cloned product editor opens you will need to make the following modifications:
- Name – Enter a new name. The system defaults to the original name, and adds “copy 1" at the end.
- URL - You must change the URL. The system will allow duplicates and the oldest product will display.
- Change body text, meta tags, images, etc. as needed.
- Under options, reset the View Count to 0.
- Save.
Product Fields
Review the following product fields. The fields below are commonly used to create a basic product.
| Fields | Entry Instructions | Required | |
|---|---|---|---|
| Active | Select to display the product on the website. | ||
| Name | Enter a name to be used internally for the product. Use lowercase characters and dashes in place of spaces. | ||
| SKU# | If SKUs are used, the value entered must be unique. Used to synchronize with external databases or platforms, like Quickbooks. | ||
| UPC# | Global Trade Item Number or Scan Code. | ||
| URL | Direct URL to reach this product. Use all lowercase letters, no accents or special characters and insert hyphens (-) instead of spaces. If you assign a URL to your product(s), choose the type of page the product should open in by going to the Options tab and making a selection in the Open in Page field. | ||
| Content | |||
| Published | Choose the publication date for this product Backdating is allowed. | ||
| Hide Date | Check this box to prevent the date from showing | ||
| Product Type | Select Product, unless the product is a subscription. | YES | |
| Headline | Enter the title of the product you want to appear on the website – this is usually the actual product name. | YES | |
| Product Group Name | You can group similar products with different SKUs in a product group so they appear in a search. | ||
| Vendor | If you are a reseller, choose the vendor who owns the item. Use the Add New button to quickly add a vendor with limited attributes. Click Edit to open the Edit Vendor dialog box and create or modify a vendor. | ||
| Summary | Enter a summary to display in search results or compact views. | ||
| Body | Enter the full sales text/description for the product. | YES | |
| Category | Choose the category/ies the product belongs to. Categories allow products to display on Product Category landing pages. The Product Category editor is found in the eCommerce list of All Tasks. For more information, see: Creating and Managing Categories. | ||
| Tag Cloud | Add Tags to your product. | ||
| Meta Tags | |||
| Meta Title & Description | See eCommerce Extra Lesson - Maximizing Product SEO | ||
| Media | |||
| The Media tab allows you to add photo(s) of your product. The interface and process are the same as for adding photos to other items. For more information: General Training - Adding Images & Attaching them to Items. | |||
| Pricing | |||
| Price | The product price is expressed in cents and does not use decimals. A product priced of $29.95 is entered as 2995. A $500 product is entered as 50000. | YES | |
| Price on Sale | Enter a sale price ONLY when the item is on sale, otherwise leave blank. A value in this field overrides the Price field. Enter values in cents without decimals, as with the price. | ||
| Unit Cost | Optional. You can enter the wholesale or unit cost of the item. This will not display. | ||
| Currency | Choose the appropriate currency. | YES | |
| Qty | Enter the number of units in the product. Typically, this is set to one. For Wineries: when selling a case of wine, enter 12 as the quantity, but set the shipping weight at the weight per bottle. | YES | |
| Disable Discounts | Click to prevent discount policies from displaying. See eCommerce Lesson ? - Adding Discounts to learn about discounts. | ||
| Discount Policies | Select the policy for discounts, if applicable. | ||
| Excluded Discounts | Select discounts not available for this product, if applicable. | ||
| Promo Codes Allowed | Select promo codes that can be applied to this product from the drop down menu. Note: The Promo code must have the 'Restricted' box checked. |
||
| Promo Codes Excluded | Select promo codes that cannot be applied to this product from the drop down menu. Note: The Promo code must have the 'Restricted' box checked. |
||
| Min. Quantity | Enter a minimum quantity, if applicable. | ||
| Max. Quantity | Enter a maximum quantity, if applicable. | ||
| Attributes | You can add multiple filtering options, like color and size, to your products to enhance searches for your customers. Lesson 3 - Creating and Managing Product Attributes | ||
| Shipping | |||
| In order to apply shipping charges to orders, one of the following three fields must be completed: Weight, Fixed Shipping or Shipping Profile. | |||
| Disable Shipping | Click the box when the product does not have a shipping charge. | ||
| Require DOB | Select 'Yes" to require date of birth entry during checkout. | ||
| Weight | Enter a per unit weight, if weight is used for shipping. Wineries should enter the individual bottle weight, even when the order is for a case. | ||
| Dimensions | Enter the Length, Width, Height of shipment and select the Unit of measure. Information will be used for dynamic shipping costs. | ||
| Fixed Shipping Cost | Enter a fixed shipping cost. Shipping cost, like price, is expressed in cents. Do not use decimals. A shipping cost of $5.99 is entered as 599. | ||
| Shipping Profile | Create a shipping profile or use/modify the default profile. Shipping profiles are explained in more detail below. Lesson 4 - eCommerce - Shipping Profiles. | ||
| Inventory | |||
| Sold Out | Click the box if the item has sold out. When checked, the product cannot be added to the shopping cart. | ||
| Track Inventory | Click the box if you want available quantity to be automatically decreased after a purchase. | ||
| Inventory | Quantity available for online purchase. If 'Track Inventory' is selected, this amount decrease with each online purchase | ||
| Coupons Available | List all available coupons if the product type is 'Coupon'. | ||
| Coupons Purchased | Purchased coupons will be listed here when 'Track Inventory' is selected. | ||
| Access Duration | Use these settings if the product type is 'Paywall' or 'Directory'. Enter a numeric value for how long to extend access and select the type, i.e. Duration - 2 and Duration Type - Months. | ||
| Directory | For product type 'Directory'. Directory Level Upgrade sets the directory level. Directory Level Downgrade sets expired listings at a lower level rather than hiding the listing. If left blank, the listing will not appear after the expiration date. | ||
| Options | |||
| Show Always | Ignore | ||
| View Count | Shows the number of times the product has been viewed. A webpage may contain a list of Most Viewed products. You can manually modify this number, if desired. | ||
| Purchased Count | Shows the number of times the product has been purchased. You can manually modify this number, if desired. | ||
| Open in Page | Advanced - This article will typically open in the default page configured to display products. The default is set in Web Site > Global Settings >Product Plug-in You can override the page by selecting a different one from the drop down menu. | ||
| With Params | Advanced | ||
| Search Hide | If you do not want the product to be searchable through a website search, select Hide from Search Results from the dropdown menu. Select Show in Search Results or leave blank to make it searchable. | ||
| Search Weight | You may want a certain product to appear above others in a search. You can assign a numerical value here and articles with higher numbers will appear first. | ||
| Feeds | Controls how fields are submitted to feeds, like Google Shopping. Visit Google Merchant Center for more information. | ||
| Notes | Optional place to store internal notes. | ||
Preview your Product
You can preview your product at any time by clicking on the Preview button. It is not necessary to Save before using Preview.

In Preview mode, a new tab will open and this orange box will appear at the top. You cannot edit the product from this view, but you will be able to see how it looks, even if it is not Active.

After you view your preview, close the tab and click back to the product edit screen to make revisions. NOTE: If you edit the article, close the Preview tab and click Preview again. You cannot refresh Preview Mode.
Changing the Display Order of Products
When products are assigned to a category, products are displayed from newest to oldest.
To change the order of a product in a category manually:
- Open the appropriate product category.
- Open the Products tab.
- Click and drag products up and down to change their order.
For more information: General Training: Creating and Managing Categories - Save.