The LVSYS CMS allows you to manage your orders in one convenient location. The list screen displays summary information about your orders and provides search and filtering tools so you can easily view patterns or find specific orders. An Export function allows you to export all order data to a spreadsheet.
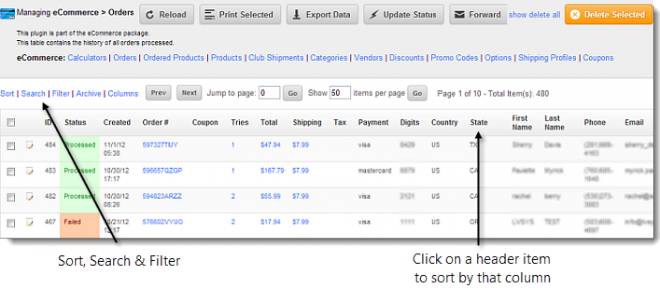
Searching, Sorting and Filtering Orders
Search orders: 
- Click the Search link.
- Enter a search term or phrase. Select All Fields to search all fields (not just list view summary data).
- Click Search to view the results.
- To undo the search, return to the Search feature and click Clear to clear the fields.
Sort orders:
- Quickly sort orders by clicking a column heading to sort by that column in ascending order. Click the heading again to sort in descending order.
-
To sort by multiple columns, click the Sort link in the upper right.

- Choose up to 3 columns to sort in either ascending or descending order. The left most field acts as the primary sort, while the following columns act as the secondary and tertiary sorts.
- Click Sort to view the results.
- To undo the sort, return to Sort and and click Clear to clear the fields.

Filter orders:
- Enter filter terms in fields. Entering multiple terms filters results to orders that meet all of the filter criteria. Select Match Any if you want results to show items that match any of the terms entered.
- Click Apply Filter to view results.
- To undo the filter, return to Filter and click Clear.
Viewing and Managing Order Details
View all order details, including error messages, by clicking linked text (such as Order#) in the Orders list screen or click the Edit button to the left of the order listing. 
Changing the Order Status
In the details screen, only the Status field can be changed. You can change the Status field after you fix a failed transaction. Remember to Save after you change the status.
Exporting Data
If you want to analyze your sales data in more detail, you can Export your list to a .csv program like Excel. The download process varies by browser:
- Internet Explorer and Firefox display dialog boxes asking you to Save or Open.
- Chrome displays a download message at the bottom left of the screen – click the file name to view the data.
Click the Export Data button shown below.

The Export Items window will open.
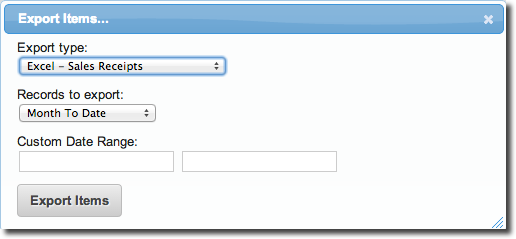
The First Drop Down menu offers four options of data for export.
2. Excel - Items Sold - This report includes a line item for each product sold. There will be multiple lines per order. Select the time period or items as described in #1 above.
3. Excel - Sales Receipts with Items - All products and orders will be summarized. Select the time period or items as described in #1 above. NOTE: Selecting this option combines the first two options into one spreadsheet.

4. Ship Compliant - Items Sold - WINERIES ONLY - These reports will integrate with third party Ship Compliant software. Select time period or specific items from the list as above.