Customizing List View
When you add articles, products (eCommerce), events, contacts, categories or pages, they are all organized in a list. You should familiarize yourself with the List View and learn how to take advantage of the many features available.
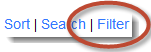
A bar similar to this appears above each list.

Here are the tools available on this menu.
Sort - Items can be sorted according to the column heading.
- Click on a desired column heading to sort the list in ascending order.
The sort is applied through all of the pages of the list. - Click the column heading a second time to change the sort to descending order.
Multi-level Sort - Click the Sort button and sort items on the list by any criteria (up to three) with the drop down menus.
- Click Sort to open the 3 column sorting fields. Sorts are created left to right.
- Choose a value to sort by in the first column.
- Choose whether to sort Up (ascending order) or Down (descending order).
- Click Sort to view results.

Up - Alphabetically From A to Z - Dates - From oldest to newest
Down - Alphabetically From Z to A - Dates - From newest to oldest
Search - Type in the word or phrase you want to Search for. Click the 'Search all fields' box to search fields not shown on your list. Click Search. After you have finished working with the list shown from your search, Click Search - Clear to restore the complete list.
Filter - See detailed instructions below
Archive - DISREGARD - Advanced, seldom used feature for Articles only.
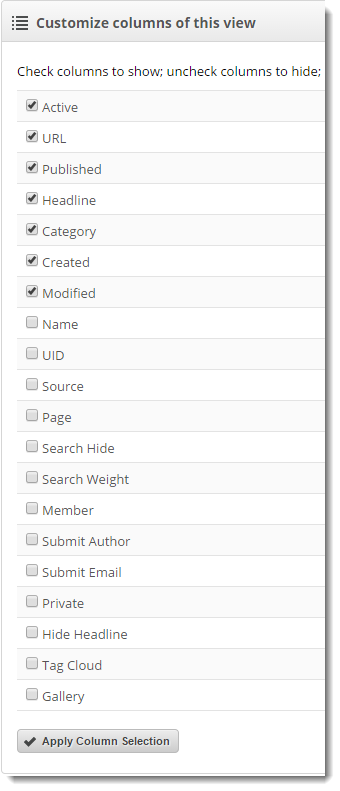
Columns - The columns appearing above your list will vary depending on the type of item you are viewing, but list views function the same way. You can decide which columns you want to appear in list view. Click on Columns and check the box in front of each column you want to include.
You can easily change the order of the columns in your list view. As you hover over the column name in the column edit view, a crosshair will appear. Simply click on a column name and drag it to a new position. Make sure to click Apply Column Selection to save your changes.
Manual Sort - On some lists, you can drag items up and down to re-order them. Just hover over the item and a cross-hair will appear. After you are finished re-ordering, click SAVE ORDER. You can add the Sort # Column to your display.
Photos in List View
If you include the Photo column when you customize columns, the first image appearing in the Media Tab will display for each item in list view. This makes it easy to find the item associated with the image.
Quick Edits in List View
You can click on the Pencil icons to edit content on some columns while viewing a list. Be sure to click on the blue Save icon  after making edits. To review Quick Editing, see Introduction - Lesson 4 - Using Live Site Editing, Quick Edit and CMS Keyboard Shortcuts.
Filter Items in List Screen
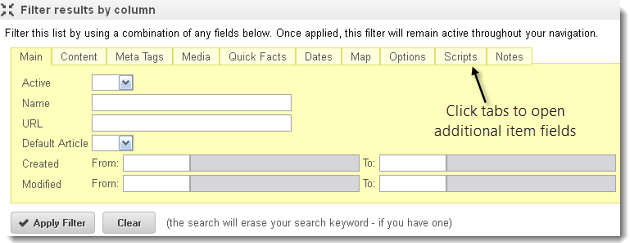
Filter allows you to search for a group of items with the same multiple criteria. The filtering tool searches all item attributes and shows only the results matching the search criteria.
To filter:
- Click the Filter link above the item list.
- Select and/or enter filter terms in fields.
Click on tabs to open additional filter fields. - Click Apply Filter to see results.
Modifying Filter Criteria
If the results are unexpected, you may need to modify the criteria in the filter fields. To modify the filter:
- Click the Filter link to re-open the filter fields.
- Change fields as needed.
- Click Apply Filter.
Removing Filters

Filtered results display only items that meet your search criteria. A message displays above the filter link to remind you about the filtered view. To undo the filter and view all items:
- Click the Filter link to re-open the filter fields.
- Click Clear to erase the filter and restore all items.
Filtered results persist for the length of your admin session. Once you log out, the list screen resets to display all items.
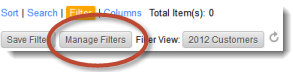
Saving Filters for Reuse
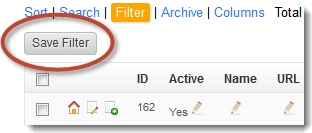
If you create a filter you wish to use again, you can save it. Saved filters can be activated with a single click.
- Create and run the filter you wish to save.
- Click the Save Filter button that displays after running the filter.
- In the Save Filter dialog box, enter a name for the filter and click Save.
- The filter displays below the Sort, Search, Filter icons.
![]()
You can also specify the columns you want to display, re-order them and save them with your filter. Follow the steps above under columns.
Using a Saved Filter
To use a saved filter, click on the name of your saved filter.
Modifying a Saved Filter's Criteria
To modify the criteria of a saved filter:
- Click the Filter link, as if you are creating a new filter.
- Change fields as needed.
- Click Apply Filter.
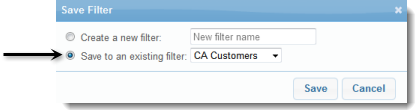
- Click Save Filter.
- In the Save Filter dialog box that opens, choose the saved filter's name in the Save to an existing filter menu.
- Click Save.
Renaming a Filter
- To rename a saved filter, click the Manage Filters button.
- Click in the filter's name field and edit the name as desired.
- Click Save Changes at the bottom of the dialog box to complete the name change
Deleting a Saved Filter
- To delete a saved filter, click the Manage Filters button.
- Click the X to the right of the filter name.
- Click Save Changes at the bottom of the dialog box to complete the deletion.
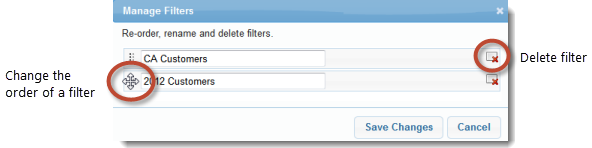
Changing the Display Order of a Saved Filter
When you save more than one filter, the filters line up under the Sort, Search, Filter icons. To change the display order of a filter, complete the following actions:
- Click the Manage Filters button.
- Position your cursor on the area to the left of the filter name.
- When your cursor turns into a crosshair, click and drag the filter to the desired position.
- Click Save Changes at the bottom of the dialog box to complete the deletion.
Exporting a list
You may want to create a csv or Excel document containing items from the list view. Click Export to download the list to your computer.
This box will appear.

Select Visible columns or All columns and the format, then click Export. Visible columns are determined by the Columns you selected above.
Publish SM
If you want to publish an item to Facebook or Twitter, Click Publish SM and select the desired destination. Now click Publish to Social Media.