FAQ - Images and Documents
This section contains common questions about adding and using images and documents. For more information, see our User Guide.
Why are my images slightly darker after upload
When an uploaded image is used in various places throughout your website, the system creates copies of the image in the correct size for the specific page or thumb. Images can be uploaded in these formats: PNG, JPG, GIF
PNG and GIF images will not darken when resized. JPG images tend to darken with each resize.
Here are some hints for maintaining the original appearance of the image:
- Upload PNG or GIF format
- Upload JPGs smaller then the Photo Maximum Size in All Tasks > Web Site > Global Settings > Media Settings
- Resize JPGs to the exact size required for the template before uploading.
What if my image will not upload?
If you have uploaded your image, but it does not display in the images list screen, please check to see if the size of the image exceeds the limit of 1000 px by 1000 px. If it does, resize the image in an image editor before uploading to the server.
How do I change the picture Facebook (or other social media) shows for my article?
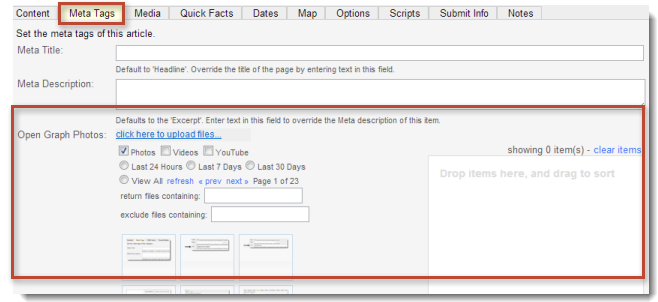
When you share an article or web page on Facebook, Linkedin or other social media, Open Graph Protocol (OGP) will choose an image to appear with your post. The CMS allows you to easily change the image to one you prefer by following these steps in the Meta Tag tab of your article or webpage:
- Open the article or web page editor.
- Open the Meta Tags tab.
- In the Open Graph Photos section, click and drag the image you wish to display to the display pane.
- Click Save.
To learn more about uploading and selecting images, see Uploading Images.
What should I do if the Upload Link is Not Visible?
There are two possible reasons why the image upload link does not display. Our file uploader uses Adobe Flash, so when the button does not appear, it's usually because Flash is disabled or compromised.
- https:// - Accessing the Admin Panel through https prevents the Flash component from working. Log in again by using just your domain name. Ex. - lvsys.com/admin
- Flash - Make sure your browser has Flash, and it is up to date on your computer. Without Flash, you cannot upload files to your website.
Adobe (the manufacturer of Flash) has a test page that shows the latest version available for different browsers as well as detecting and displaying what version you have (if any) on your machine. See Adobe's page here: Adobe Flash
How can I resize a photo before uploading?
Once a photo is uploaded, it's easy to size it down or crop it with our image editing tools.
There are times you need to resize a photo prior to uploading, for example when you are working with ads requiring exact photo sizes.
Luckily, all operating systems come with an image editing utility. On Windows, you can use Microsoft Paint to accomplish this task.
Here's a link to a Microsoft tutorial explaining how to use Paint to resize an image: http://windows.microsoft.com/en-us/windows7/resize-a-picture-using-paint
Make sure to save the photo to JPEG, JPG or PNG as these are the preferred image formats.
How do I change the window icon (favicon) displayed in browsers?

It's easy. Here is the step by step process to change your favicon:
1. Make a 16x16 image in either: ICO, PNG, or GIF format
Make sure to select the format supported in the browsers most used by your audience. Please refer to this Wikipedia article for up to date information regarding favicon and supported browsers: http://en.wikipedia.org/wiki/Favicon
2. Upload the image to your photo folder
Go to All Tasks->Files->Images and upload your icon. Image upload instructions are here.
3. Update the Meta Head section of your website.
Go to All Tasks->Web Site->Global Settings->Page Settings->Meta Head (see screenshot below) and add (or modify) the existing code and click Save.
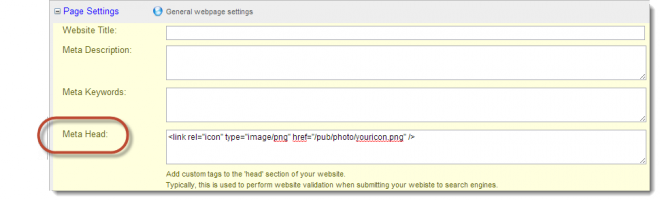
<link rel="icon" type="image/png" href="/pub/photo/youricon.png" />
It's important to match the image type with the image extension, or it won't work.
Also, these are case sensitive, make sure to have exactly the same letter casing as the uploaded photo.
4. Refresh your browser.
Refresh your browser and check to see if the new icon is displaying. Please note that your browser may cache the prior icon for some time. Use a different browser to check if you have done many updates within the past few minutes.
How Do I Link to Uploaded Documents in Articles, Products and Other Items?
You can create links to your uploaded documents in articles, products, events or any item with modifiable body text by using short code. Just open the article editor, product editor, or event editor and insert short code in the Body (or Summary) field. See the links below for instructions and details:
Where do I upload images?
There are several ways to access the upload feature.
Click the Upload Files button from the Top Menu Bar. From here you can Drag & Drop or browse for images.
You can also upload images from: the Media tab of an item or directly from All Tasks > Files > Images. The Upload Files button appears above the list of images, documents, etc. For more information, see: Uploading Images
Looking for more? See what Buildable and the LVSYS CMS can do for you today:
![]()
The LVSYS CMS is a Buildable product.
Buildable
620 NE 3rd Street, Suite A
McMinnville, OR 97128